Menu — Recipes
Manage recipes tied to menu items, see ingredient counts, and analyse costs at-a-glance.
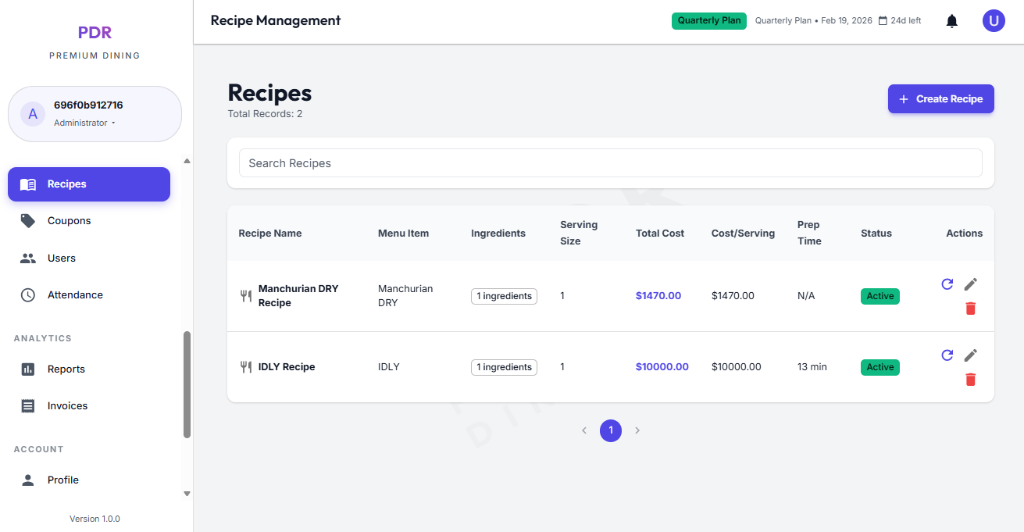
📚 Recipe Dashboard
The Recipes tab shows a searchable table of all recipes with quick insights and actions. Use the top search to filter by recipe or menu item, and the tab row to switch between Items, Categories, Trays, Recipes, and Add-ons.
Recipe Rows
- Recipe Name: Displayed with a small icon and links to the recipe detail.
- Menu Item: Shows the associated menu item name.
- Ingredients: Badge showing number of ingredients (e.g., "1 ingredients").
- Serving Size: Number of servings the recipe yields.
Cost Analysis
- Total Cost: Currency-formatted total cost for the recipe (shown in the table).
- Cost/Serving: Per-portion cost for easier pricing and margin checks.
- Prep Time & Status: Prep time column plus an Active/Inactive status badge make planning simple.
Management Actions
- + Create Recipe: Button in the top-right opens the recipe builder.
- Row Actions: Use the row action icons to 🔄 Recalculate cost, ✏️ Edit recipe, or 🗑️ Delete.
- Pagination: Quickly navigate pages from the footer pager when there are many recipes.
📝 Creating a Recipe
Click the "+ Create Recipe" button to open the configuration form. This interface links your menu items to your raw material inventory.
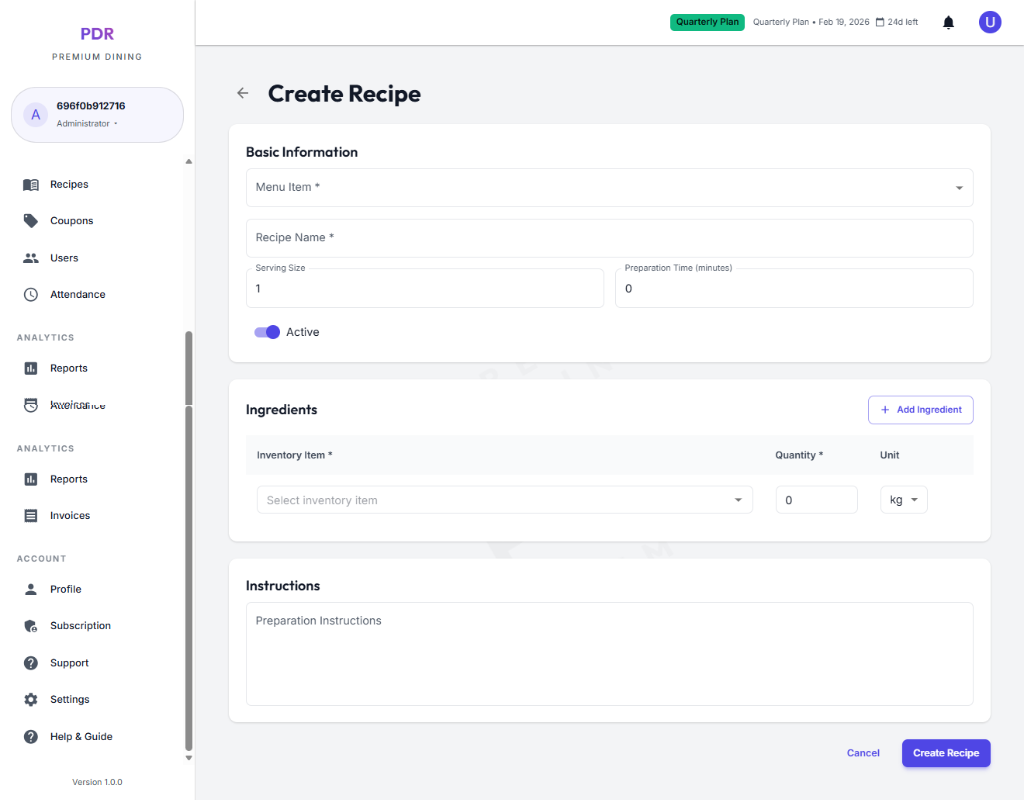
- Basic Information:
- Menu Item: Select the finished dish from your menu (e.g., "Chicken Biryani"). This links the recipe to sales data.
- Serving Size: specific the number of servings this recipe yields (e.g., "1").
- Prep Time: Enter the time in minutes required to prepare the dish (e.g., "15").
- Active Toggle: Enable this to start tracking stock usage immediately.
- Ingredients:
Build the recipe by adding raw materials one by one:
- Inventory Item: Search and select the ingredient (e.g., "Rice", "Chicken").
- Quantity & Unit: Specify the exact amount used (e.g., "200 g"). The unit should match your inventory tracking unit.
- + Add Ingredient: Click this button to add more items to the list.
- Instructions:
Use the large text area to document the Preparation Instructions. This serves as a guide for kitchen staff to ensure consistency.
✏️ Edit & Recalculate
Click the Edit icon on any recipe row to open the detailed edit interface. Here you can modify all aspects of your recipe, and an audit trail tracks all changes made over time.
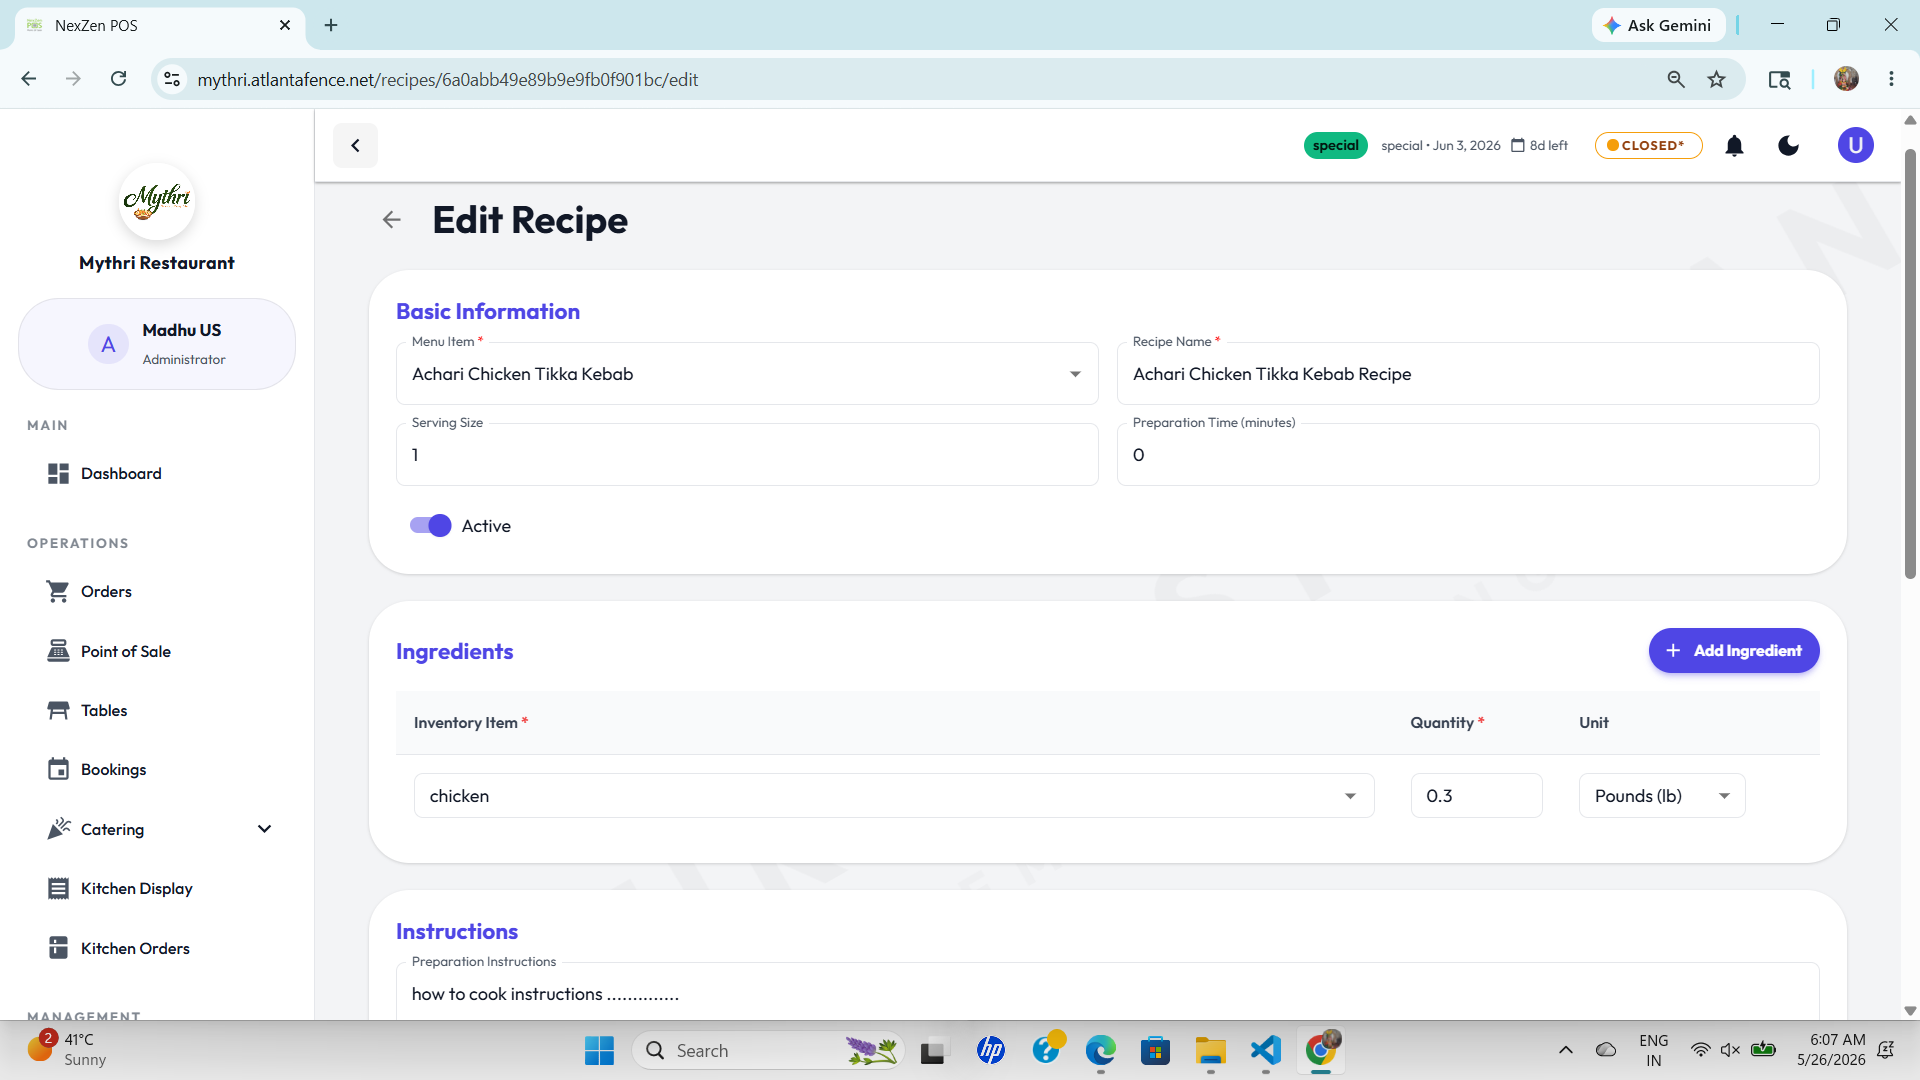
Edit Recipe Form
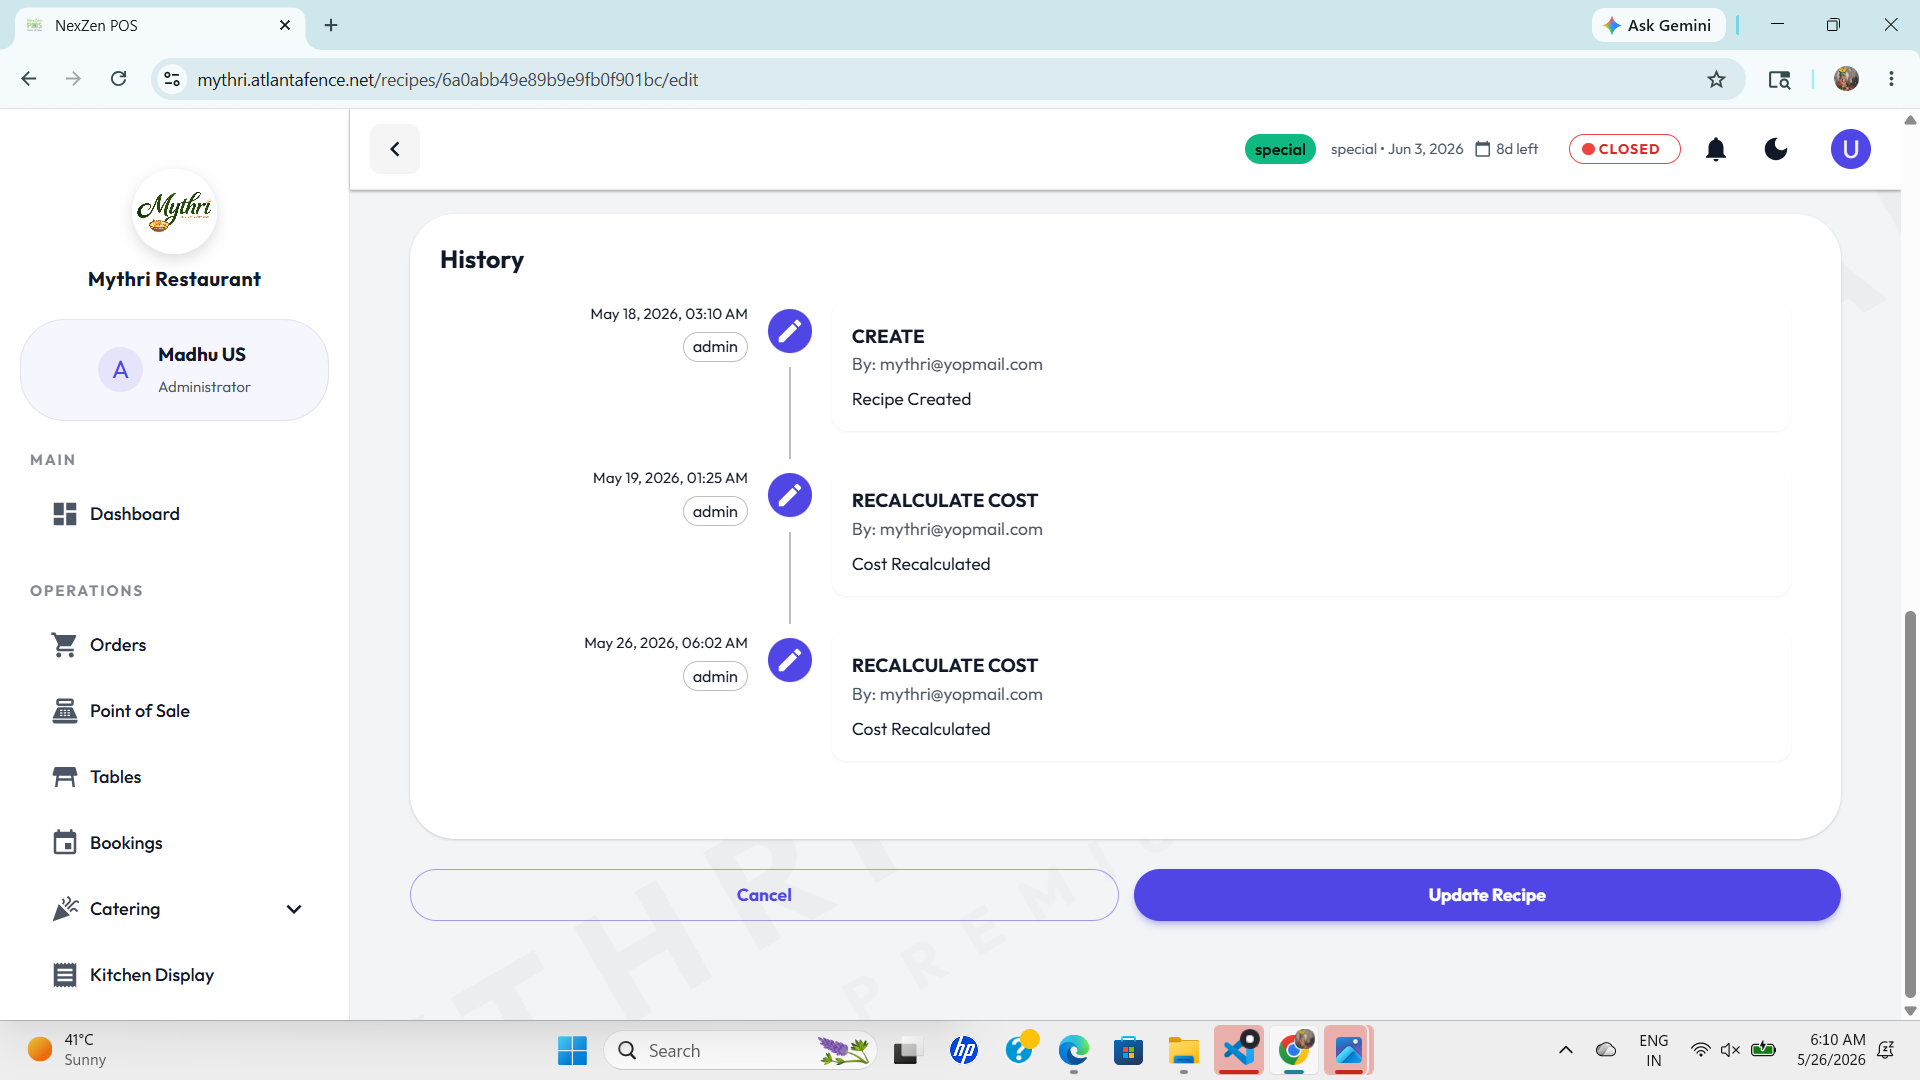
History & Audit Trail
Edit Recipe Form (Left)
- Basic Information:
- Menu Item: Dropdown showing the linked finished dish (e.g., "Achari Chicken Tikka Kebab").
- Recipe Name: Full name or description of the recipe. This can differ from the menu item.
- Serving Size: Number of servings the recipe yields (e.g., "1").
- Preparation Time (minutes): Time required to prepare the dish.
- Active Toggle: Enable or disable cost tracking for this recipe.
- Ingredients:
- Inventory Item: Dropdown to select raw materials from your inventory.
- Quantity: Amount used (e.g., "0.3").
- Unit: Measurement unit matching your inventory (e.g., "Pounds (lb)").
- + Add Ingredient: Button to add additional ingredients to the recipe.
- Instructions:
Text area for Preparation Instructions guiding kitchen staff on how to prepare the dish.
History & Audit Trail (Right)
- Timeline View: Displays a chronological record of all changes made to the recipe.
- Event Types:
- CREATE: Initial recipe creation with date, time, and user who created it.
- RECALCULATE COST: Logged each time ingredient prices change and costs are recalculated.
- Event Details: Each entry shows timestamp (e.g., "May 18, 2026, 03:10 AM"), admin user role, event type, and description (e.g., "Recipe Created", "Cost Recalculated").
- Audit Purpose: Provides a complete history of modifications for compliance, troubleshooting, and understanding cost changes over time.
💡 Tip: When ingredient prices in your inventory change, use the Recalculate Cost action from the main recipes table to automatically update the Total Cost and Cost/Serving for all affected recipes. This ensures your costing remains accurate.
🗑️ Deleting a Recipe
Click the red Trash icon in the Actions column of any recipe row to delete it. A confirmation dialog will appear asking you to confirm the deletion with the recipe name displayed. This prevents accidental deletions.
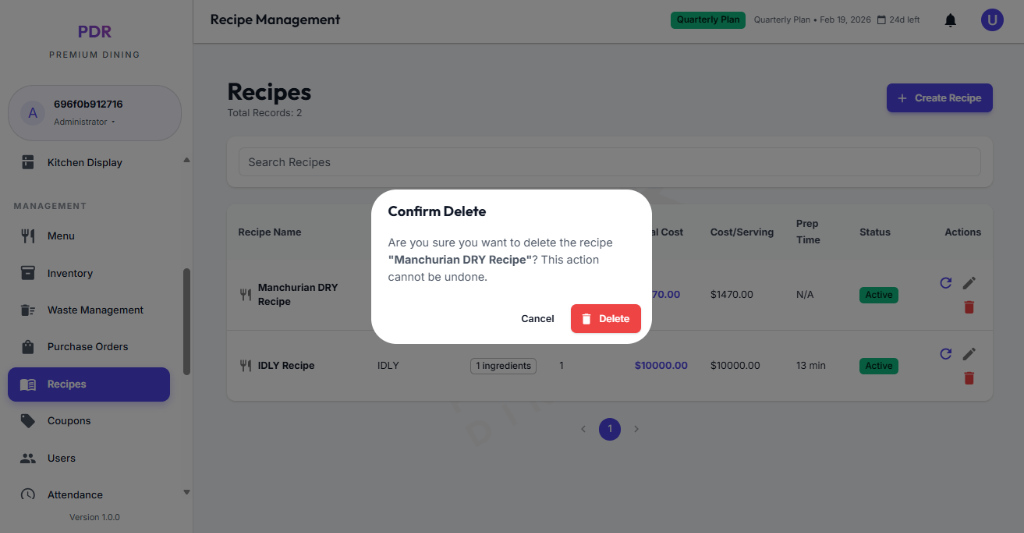
- Confirmation Dialog: Displays the recipe name and a warning that "This action cannot be undone."
- Cancel: Click to close the dialog and keep the recipe.
- Delete: Click the red Delete button to permanently remove the recipe.
- Impact: Deleting a recipe removes the link between the menu item and inventory deductions. The menu item itself remains in your menu.